DIY Ferret Tunnel System
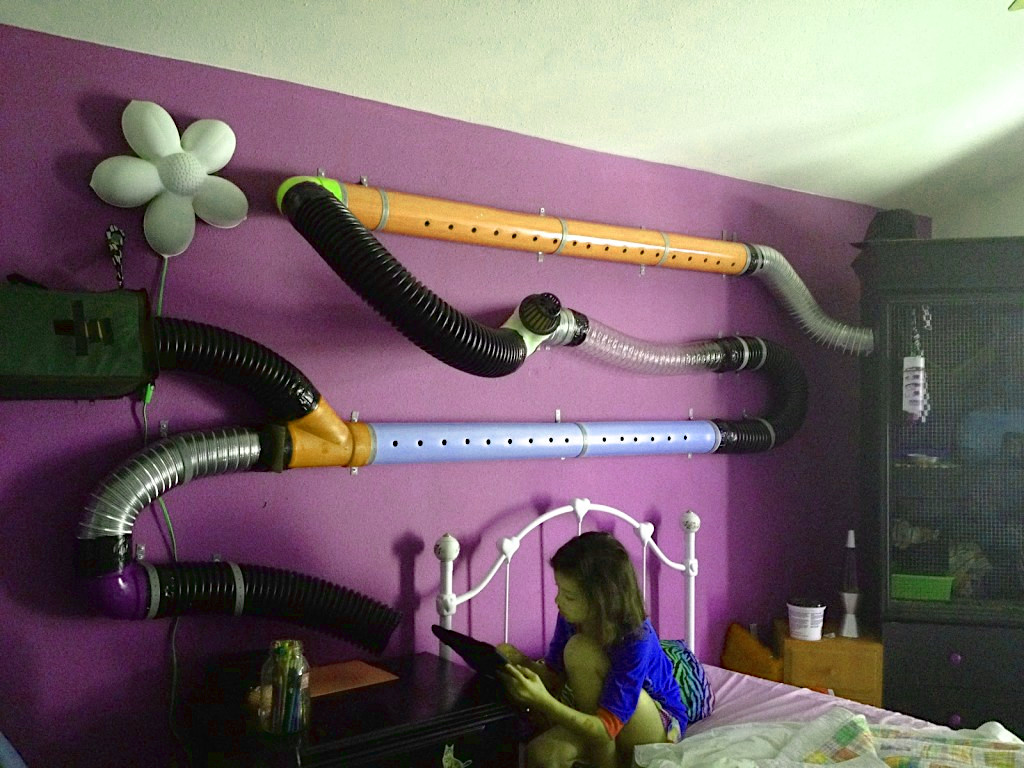
DIY ferret tunnel setup
We all know how much ferrets love playing and exploring. They are always slithering about, crawling, digging, and whatnot. One thing you will often see when they are burrowing, and digging is that they tend to create tunnels for themselves.
Ferrets have a natural desire to explore tunnels, but they don’t just use tunnels to pass through, they also chase each other and hide their toys or even food in these tunnels! So, making a DIY ferret tunnel can be an amazing investment in your ferrets’ play area.
What you will need:
- Spare tunneling/ PVC pipes/ dryer tubes/ cardboard boxes/ flexible plastic pipes/ plastic bottles (to be used as tunnels)
- Duct tape
- Pipe connectors (optional)
- Scissors
- Wire or ties (if hanging)
Step 1:
Choose the type of tunneling you need.
To figure out what type of tunneling it is that you need, try asking yourself these questions:
- Will you keep the tunnels on the ground or hang them from above?
- Do you need them to be flexible to form different shapes and curves?
- Is it going to be a permanent addition to the play area, or should it be removable?
- Would you like to watch your little pets as they pass through?
- Do the colors of the DIY ferret tunnel system matter? Are there any specific colors you want?
- How much are you willing to spend on the tunneling system?
Once you know the answers to these it will be easier to find the tunnels you need as you will know exactly what you are looking for. You could also use a combination of different types of tunnels. Another thing to look out for is that the tunnels are wide enough for the ferrets to crawl through easily. Usually about 3-inch-wide tunnels are safe enough for them to explore.
Step 2:
Plan out your ferret tunnels
Arrange the tubes in the order you want, creating pathways that branch off in other directions. If you are using PVC pipes or ones that aren’t flexible, try using pipe connectors to form “branches” that go in different directions such as “Y” “T” or simply “elbow’ connectors to send them all around the room.
If you would like to make your DIY ferret tunnel system more interactive, add some “dead ends” that can be used as hiding spots. and be sure to create lots of twists and turns
Step3:
Ventilate the ferret tunnels
Make tiny holes (about half an inch) along the tubes using scissors or drills. This is to make sure that the tunnels are well ventilated and is particularly necessary for longer tunnel systems.
Step 4:
Connect the tunnel pieces
Using the duct tape, seal the connections between the different tubes. It is safer to tape around the connections at least twice so that they won’t come apart later and stick to the ferrets’ fur.
Step 5: (optional)
Decorate your ferret tunnel system
If you want the tunnel system to match the rest of the play space or would simply like to make it look more decorated, this is the time for that. You can use paint, wallpaper, and other materials for decorating, but always make sure that none of them have any toxic elements or small parts that could be of harm to the ferrets.
Step 6:
Secure your ferret tunnels
For the final step, set the tunnels where you want them to be and secure them in place. If you want to simply lay them on the ground, ties may not be necessary. If you want to hang them or line them along the walls instead, make sure to use ties of any sort to secure them in place so they don’t move or fall when the ferrets play inside.

And you have now created your very own custom DIY ferret tunnel system for your little fuzzys to play with! Connect them directly to their (DIY) ferret cage or just let it be a separate part of their play space. However you decide to set it up, they are sure to love this fun and curious addition to their zone.

Check out our Amazon Store for great deals on fun gear for your ferrets and you 🙂


